Erweiterter Gleichungseditor
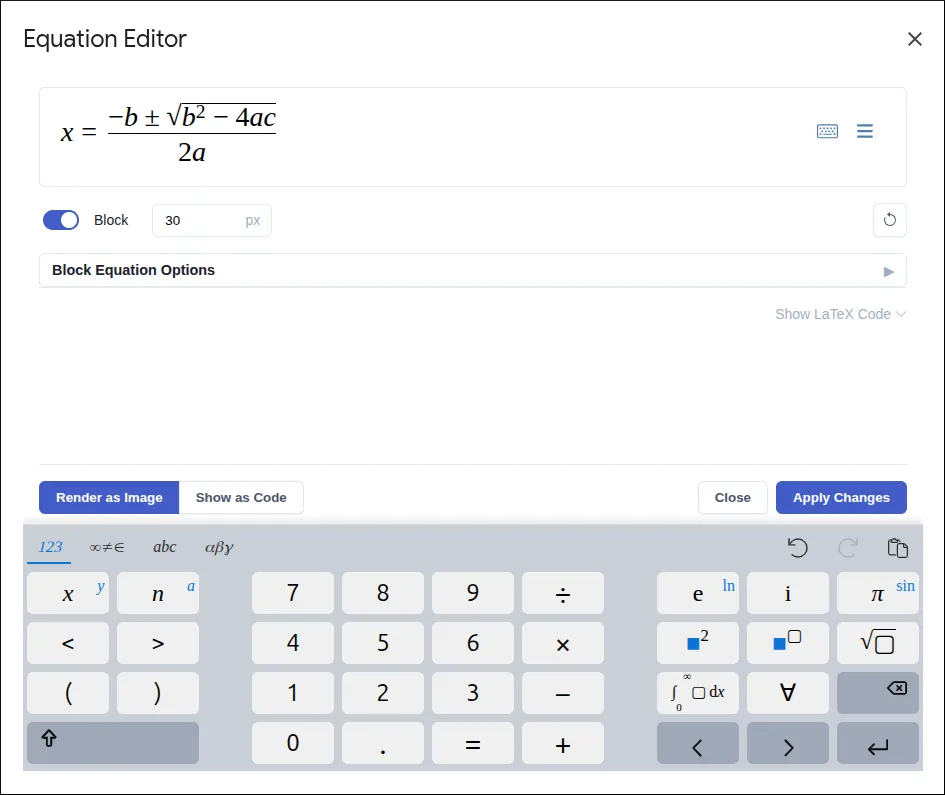
Obwohl das Werkzeug Schnelle Gleichung für die meisten Aufgaben perfekt ist, enthält das Text To Table Converter Add-on auch einen Erweiterten Gleichungseditor für Situationen, die mehr Kontrolle erfordern. Verwenden Sie ihn, wenn Sie nummerierte Gleichungen erstellen, eine virtuelle Tastatur für komplexe Symbole verwenden oder die Formatierung präzise verwalten müssen.
Zugriff auf den Erweiterten Editor
Abschnitt betitelt „Zugriff auf den Erweiterten Editor“Sie können den Editor auf zwei Arten öffnen, die beide ein großes Dialogfenster für konzentriertes Arbeiten öffnen:
- Über die Seitenleiste: Öffnen Sie das Akkordeon Gleichungen (LaTeX) und klicken Sie auf die Schaltfläche Gleichungseditor.
- Über das Menü: Gehen Sie zu
Erweiterungen>Text To Table Converter>Gleichungen (LaTeX)>Gleichungseditor.
Wenn Sie eine Gleichung in Ihrem Dokument ausgewählt haben, lädt der Editor diese automatisch.
Verwendung des Editorfensters
Abschnitt betitelt „Verwendung des Editorfensters“Der Editor ist für komplexe Arbeiten konzipiert und bietet eine Vielzahl von Werkzeugen in einem eigenen Fenster.

- Interaktiver Editor & Virtuelle Tastatur: Der Haupteingabebereich bietet eine reichhaltige Echtzeit-Darstellung Ihres LaTeX, während Sie tippen. Verwenden Sie die integrierte Virtuelle Tastatur, um komplexe Symbole, Strukturen und Funktionen einzufügen, ohne die LaTeX-Befehle auswendig lernen zu müssen.
- Reine LaTeX-Code-Ansicht: Für Power-User zeigt ein erweiterbarer Textbereich den zugrunde liegenden LaTeX-Code an, der immer mit dem interaktiven Editor synchronisiert ist.
- Bildgröße anpassen: Verwenden Sie das Eingabefeld “Zielhöhe”, um eine bestimmte Pixelhöhe für das endgültige gerenderte Bild festzulegen und so die Konsistenz in Ihrem Dokument zu gewährleisten.
- Zurücksetzen-Schaltfläche (↩️): Macht alle während der aktuellen Bearbeitungssitzung vorgenommenen Änderungen rückgängig.
- Erweiterte LaTeX-Erkennung: Wählen Sie ein Bild mit mathematischen Gleichungen aus (egal ob es mit dem Add-on erstellt wurde oder nicht) und lassen Sie es als editierbaren LaTeX-Code extrahieren — direkt aus der Seitenleiste oder aus dem Gleichungseditor, sobald das Bild markiert ist.
Erweiterte Formatierung in Google Docs™
Abschnitt betitelt „Erweiterte Formatierung in Google Docs™“Wenn Sie mit Block-Gleichungen in Google Docs™ arbeiten, stehen spezielle Formatierungsoptionen zur Verfügung, um professionell strukturierte, nummerierte Gleichungen zu erstellen.

- Layout in Tabelle: Der Hauptschalter. Wenn aktiviert, wird Ihre Gleichung in einer sauberen, rahmenlosen 1x3-Tabelle platziert. Diese Struktur ist für eine stabile Ausrichtung und Nummerierung unerlässlich.
- Nummer hinzufügen: Aktiviert die Gleichungsnummerierung. Sie können die Nummer oder Bezeichnung (z.B. “1”, “1a”, “A.1”) im Textfeld anpassen.
- Nummerierungsstil: Steuern Sie die Ausrichtung (Links/Rechts) und den Stil der Klammern (z.B.
(1),[1],1.) der Nummer. - Lesezeichen hinzufügen: Erstellt automatisch ein Google Docs-Lesezeichen für Ihre nummerierte Gleichung, was das Erstellen von Querverweisen in Ihrem Dokument erleichtert.
Das richtige Werkzeug wählen
Abschnitt betitelt „Das richtige Werkzeug wählen“Nicht sicher, welchen Editor Sie verwenden sollen? Hier ist eine kurze Anleitung:
-
Verwenden Sie den Erweiterten Gleichungseditor, wenn Sie:
- Nummerierte Gleichungen mit Bezeichnungen erstellen müssen.
- Eine virtuelle Tastatur verwenden möchten, um komplexe Symbole zu finden und einzufügen.
- Eine bestimmte Pixelhöhe für Ihr Gleichungsbild festlegen müssen.
-
Für alles andere verwenden Sie das Werkzeug “Schnelle Gleichung” in der Seitenleiste. Es ist schneller für das Erstellen und Bearbeiten alltäglicher Gleichungen.