Convert Text to Table
With the Text To Table Converter Add-On, you can effortlessly transform plain text into a proper table. It handles everything from neatly structured CSV data and basic Markdown tables to less organized text, all directly within Google Docs™, Google Slides™, and Google Sheets™.
Convert Unstructured Text to a Table
Section titled “Convert Unstructured Text to a Table”Dealing with unstructured text from emails or websites? The Selected Text to Table function uses AI to analyze and organize it into a table.
This capability also extends to converting text already formatted as JSON, YAML, HTML, or XML.
Example: Messy Contact List
Consider this text copied from an email or a document:
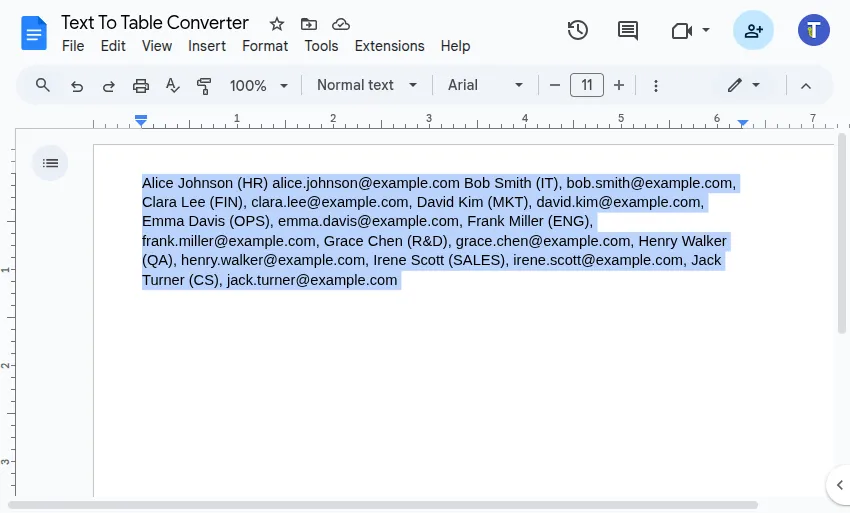
Alice Johnson (HR) [email protected] Bob Smith (IT), [email protected], Clara Lee (FIN), [email protected], David Kim (MKT), [email protected], Emma Davis (OPS), [email protected], Frank Miller (ENG), [email protected], Grace Chen (R&D), [email protected], Henry Walker (QA), [email protected], Irene Scott (SALES), [email protected], Jack Turner (CS), [email protected]Steps to Convert:
-
Select the unstructured text you want to convert within your document.
-
Go to
Extensions>Text To Table Converter>🔤 ➜ 🔡 Selected Text to Table.
Result:
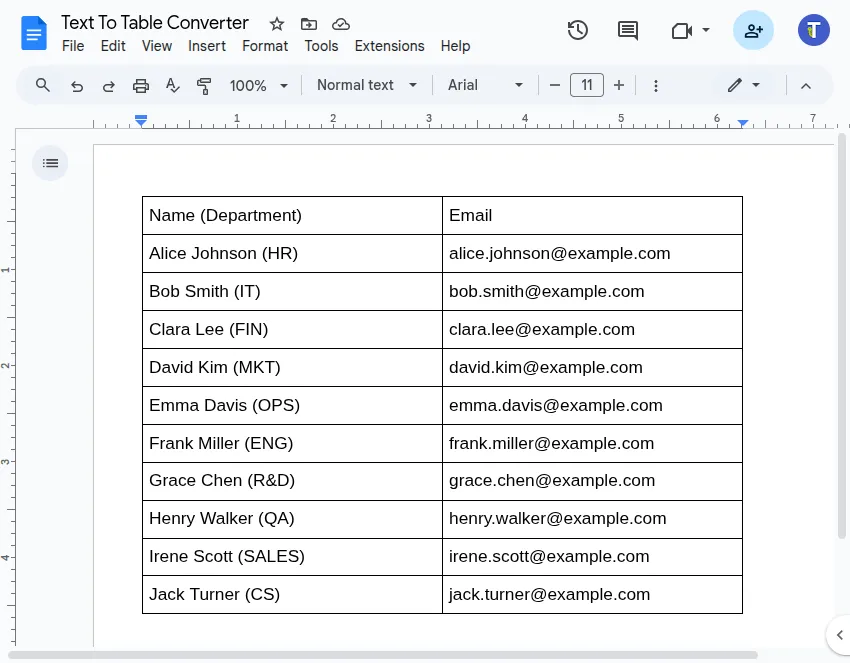
The Add-On analyzes the selected text and inserts a structured table below it, extracting the key information it identifies:
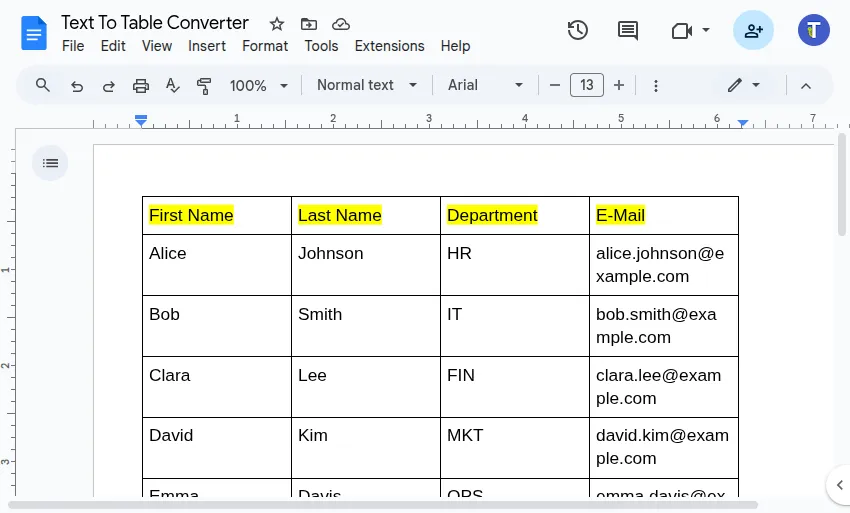
Define Column Headers
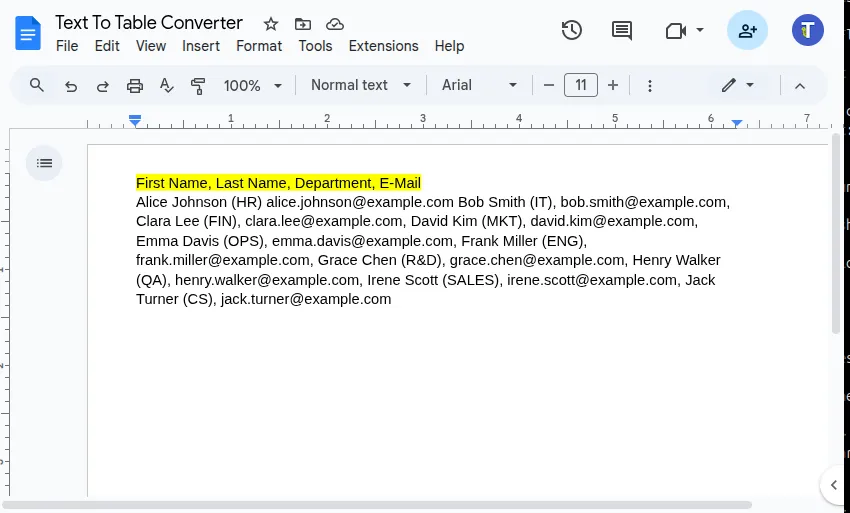
Section titled “Define Column Headers”You can further instruct the Add-On to split the data into predefined column headers.
As an example, we can split the employee name into ‘First Name’ and ‘Last Name’.
Result:
Convert Structured Text to a Table
Section titled “Convert Structured Text to a Table”Structured text typically uses consistent separators (like commas, tabs, or semicolons) for columns and new lines for rows. Our Add-On makes converting this easy using the 🔤 ➜ 🔡 Selected Text to Table feature. Note that this feature does not rely on AI usage if the text is clearly structured.
-
Select your text Highlight the block of structured text within your Google Docs™, Google Slides™, or Google Sheets™ file that you wish to convert into a table.
Example Text:
First Name,Last Name,Department,E-MailAlice,Johnson,HR,[email protected]Bob,Smith,IT,[email protected]Clara,Lee,FIN,[email protected]David,Kim,MKT,[email protected]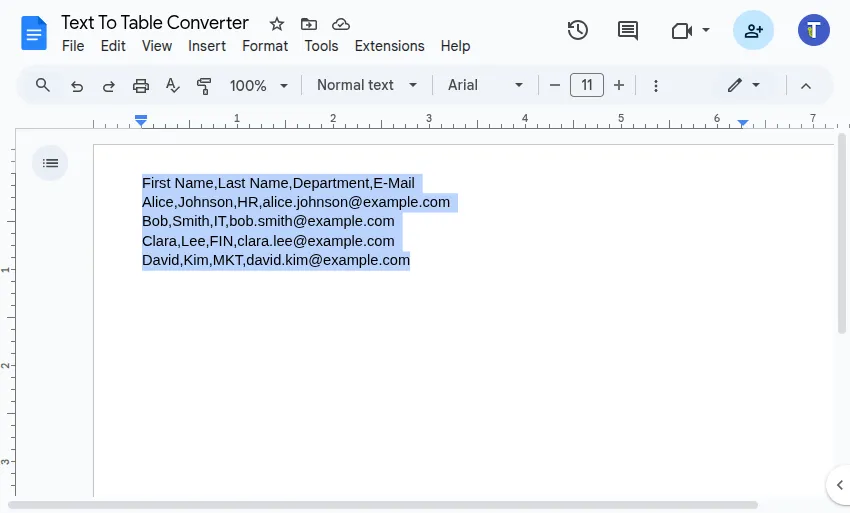
-
Run the Converter Navigate through the menu:
Extensions>Text To Table Converter>🔤 ➜ 🔡 Selected Text to Table.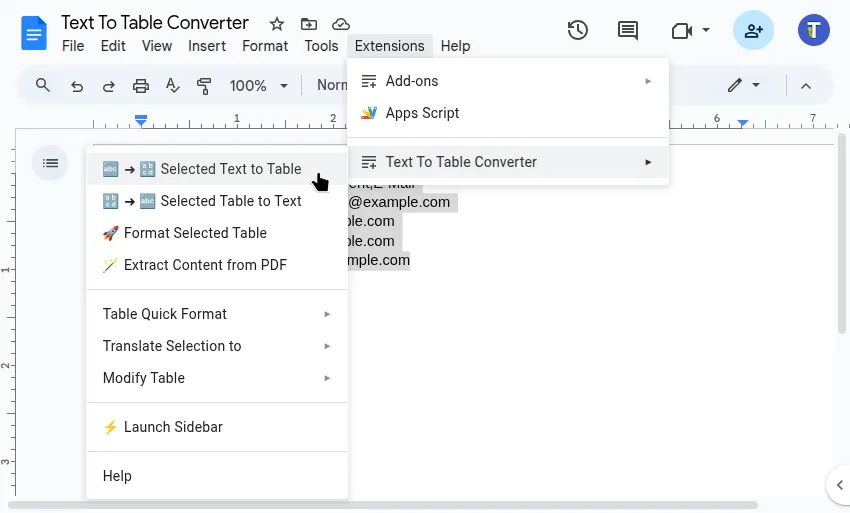
-
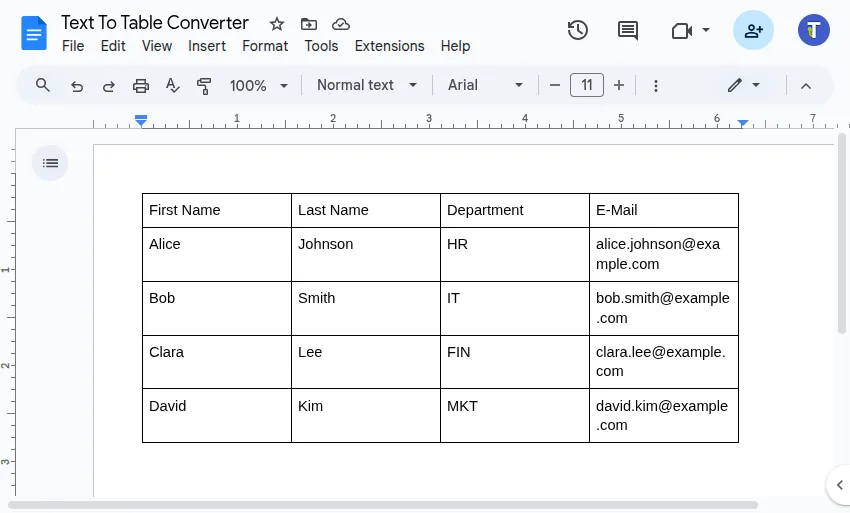
View the Result The Add-On will instantly create and insert a new table based on your selected text, usually placing it right below your original selection.
Text to Table Options (Settings)
Section titled “Text to Table Options (Settings)”The Add-On includes powerful options to give you precise control over the final table. You can adjust these settings by navigating to Extensions > Text To Table Converter > ⚙️ Language & Settings.
In the settings dialog, click on the Text to Table Options accordion to see the available options.
Always use AI
Section titled “Always use AI”This is a primary processing control. By default, the Add-On is smart about when to use AI, applying a standard parser for clearly structured text (like CSV) and only activating AI for messy, unstructured text.
Enabling this option forces every conversion through the AI processor, even for text that looks well-structured. This is useful if your “structured” text has subtle inconsistencies, or if you want to apply other AI-powered refinements (like date formatting or grammar correction) to all your data.
- Inactive (Default): Only use AI for messy text, not for text with clear delimiters (e.g., CSV).
- Active: Always use AI, even for text with clear delimiters (e.g., CSV).
Enable AI Refinement
Section titled “Enable AI Refinement”This master switch, enabled by default, controls a suite of advanced AI formatting options. Disabling it will make AI conversions faster but more basic. When enabled, you gain precise control over the final table with the following settings:
Table Orientation Preference
Section titled “Table Orientation Preference”This setting controls how the extracted data is arranged in the resulting table. It is especially relevant for lists of key-value pairs.
Row-Based
Section titled “Row-Based”Each row is a complete set of facts for one data item. Each column is a dimension.
Example input:
Subject Biology Teacher Mr. Darwin Room 101Subject Physics Teacher Mrs. Curie Room 204Row-Based Result:
| Subject | Teacher | Room |
|---|---|---|
| Biology | Mr. Darwin | 101 |
| Physics | Mrs. Curie | 204 |
In this example, there are 3 dimensions (Subject, Teacher, Room) and 2 sets of facts (Biology…, Physics…).
Column-Based
Section titled “Column-Based”Each row is a dimension, listed in the first column. Each column after that contains the facts for one data item.
Example:
Subject Biology Teacher Mr. Darwin Room 101Subject Physics Teacher Mrs. Curie Room 204Column-Based Result:
| Property | Biology | Physics |
|---|---|---|
| Teacher | Mr. Darwin | Mrs. Curie |
| Room | 101 | 204 |
Auto-Detect
Section titled “Auto-Detect”The AI analyzes the data and chooses the most logical structure, which is typically Row-Based.
Date & Time Formatting
Section titled “Date & Time Formatting”This option finds any cells that look like dates or times and standardizes them to a consistent format. If a cell contains only a date, it will not add a default time (like 00:00).
- Off: No formatting is applied.
- Auto-Detect: The AI detects the most common format in your data and applies it to all date/time cells.
- Specific Formats (e.g.,
YYYY-MM-DD HH:mm:ss): Forces all dates and times into the exact format you choose.
Number Formatting
Section titled “Number Formatting”This standardizes how numbers are displayed, which is especially useful for data with mixed decimal or thousand separators.
- Off: No formatting is applied.
- Auto-Detect: The AI detects the most common number style in your data (e.g.,
1,234.56vs1.234,56) and applies it consistently. - Specific Formats: Forces all numbers into the chosen style.
Data Cleaning
Section titled “Data Cleaning”Select one or more actions to clean up text data in your table. The actions are performed in order.
- Trim Whitespace: Removes extra spaces from the beginning and end of each cell.
- Remove Currency Symbols: Strips currency symbols (like $, €, £) from cells.
- Case Formatting (To Title Case, to lower case, TO UPPER CASE): Converts text to the selected case. You can only choose one case formatting option at a time.
Correct Spelling & Grammar
Section titled “Correct Spelling & Grammar”When checked, the AI will proofread and correct spelling and grammatical errors in text cells, improving the overall quality and readability of your table content.
Convert Markdown Text to a Table
Section titled “Convert Markdown Text to a Table”The versatile Selected Text to Table function also recognizes and converts basic Markdown table syntax.
-
Select Markdown Table Text Select the text formatted as a Markdown table in your document.
Example Markdown:
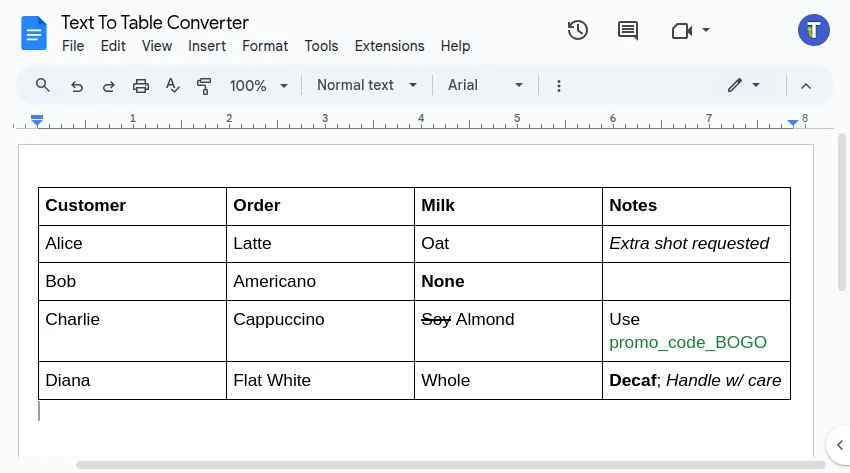
| Customer | Order | Milk | Notes ||-------------|---------------|----------------|----------------------------|| Alice | Latte | Oat | *Extra shot requested* || Bob | Americano | **None** | || Charlie | Cappuccino | ~~Soy~~ Almond | Use `promo_code_BOGO` || Diana | Flat White | Whole | **Decaf**; *Handle w/ care* |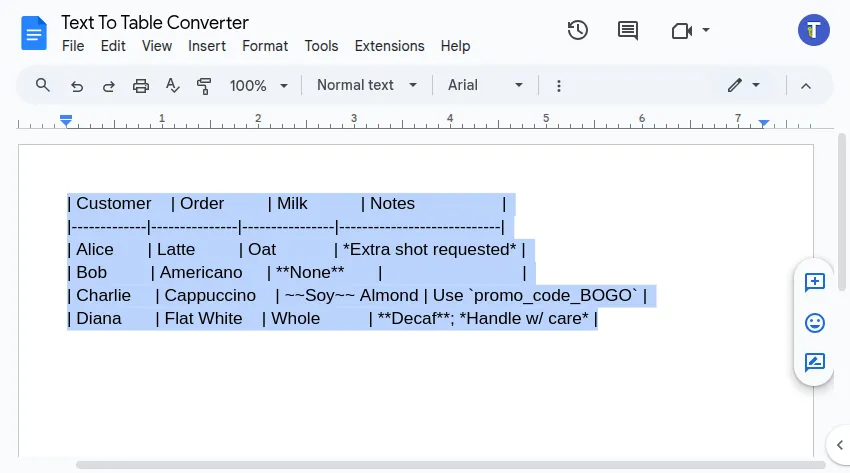
-
Run the Converter Navigate through the menu:
Extensions>Text To Table Converter>🔤 ➜ 🔡 Selected Text to Table. -
View the Result The Add-On creates a table based on the Markdown structure, applying common formatting like bold, italics, strikethrough, and code styles found within the cells.
