How to Share a Google Forms QR Code (Fast Method)
Learn how to generate a QR code for your Google Form, download it for flyers, or insert it directly into the form for live presentations.
Learn how to generate a QR code for your Google Form, download it for flyers, or insert it directly into the form for live presentations.
Додайте сканований QR-код до будь-якого файлу Google Docs™ за секунди за допомогою доповнення Text To Table Converter.
Вставляйте QR-коди в Google Sheets™, щоб ділитися дашбордами, формами та довідковими матеріалами одним скануванням.
Додайте QR-коди в Google Slides™, щоб аудиторія відкривала посилання прямо з презентації за секунду.
Reclaim your screen real estate in Google Sheets™. Learn to hide the distracting “Ask Gemini” AI button with a simple CSS snippet for a cleaner, more focused data experience.
Reclaim your workspace and minimize distractions in Google Slides™. Learn how to hide the “Ask Gemini” button using a simple CSS snippet for a more focused presentation experience.
Tired of distracting pop-ups? Learn to hide the “Ask Gemini,” “Refine,” and floating comment buttons in Google Docs™ for a cleaner writing experience using a simple CSS snippet.
Quickly convert badly formatted text lists of names into tables in Google Docs™, Sheets™, and Slides™ using our free Add-On.
Learn the surprising way to disable distracting Gemini AI features like “Help me write” and “Refine” in Google Docs™ for a more focused deep work or writing experience.
Reclaim focus in your inbox by learning how to disable distracting Gemini AI features like suggested replies and email summarization directly within Gmail’s settings.
Google Sheets™ doesn’t natively convert Markdown tables. Use the Text To Table Converter Add-On to create tables from Markdown in your spreadsheets.
Google Slides™ lacks native Markdown table conversion. Learn how to use the Text To Table Converter Add-On to create tables from Markdown in your presentations.
Learn two ways to convert Markdown-formatted text into tables within Google Docs™ using the built-in ‘Paste from Markdown’ feature or the Text To Table Converter Add-On.
Copying tables from PDFs to Google Sheets™ often breaks formatting. Learn how to easily convert PDF table data into a clean Google Sheets™ table using the Text To Table Converter Add-On.
Copying tables from PDFs to Google Slides™ often breaks formatting. Learn how to easily convert PDF table data into a clean Google Slides™ table using the Text To Table Converter Add-On.
Copying tables from PDFs to Google Docs™ often breaks formatting. Learn how to easily convert PDF table data into a clean Google Docs table using the Text To Table Converter Add-On.
Document tabs in Google Docs™ help organize files, but can you create them on mobile? Learn the current limitations of the mobile app and a workaround using the desktop site.
Learn how to use the Text To Table Converter Add-On in Google Sheets™ to convert raw CSV text data into a structured table, highlighting its advantages over native tools with a complex data example.
Struggling to adjust the width in Google Docs’ pageless format? It’s not in Page Setup where you’d expect!
The Fix:
File > Page setup > Pageless.View > Text Width: Choose Narrow, Medium, or Wide.That’s it! Not intuitive, but now you know.
Staring at a bright screen for extended periods can strain your eyes. Many users prefer dark mode when working with Google Docs™, but unfortunately, the software doesn’t have a built-in option to enable it. However, there’s an easy workaround for Google Chrome™ users that will turn all Google applications into dark mode.
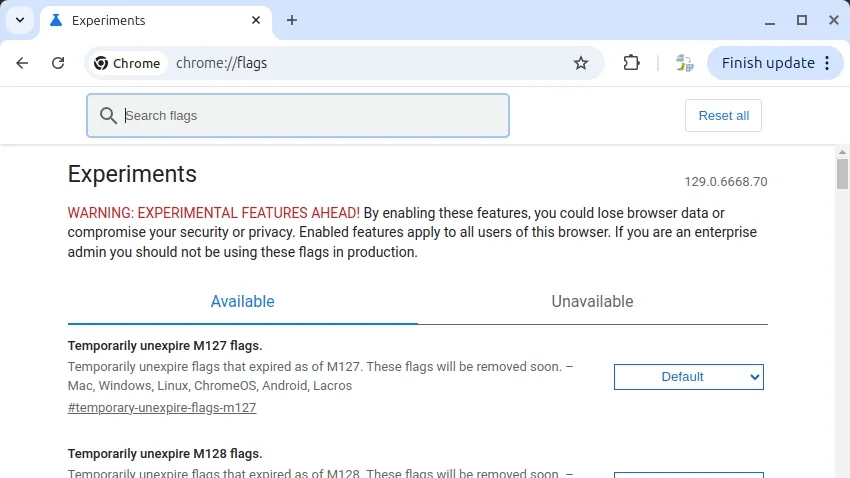
Follow these steps to activate dark mode globally across Google applications using Chrome:
chrome://flags/ into the address bar and press Enter.dark mode.Once enabled, this setting will turn on dark mode for all Google products, including Google Docs™, Google Slides™, Google Sheets™, and Google Forms™. Additionally, icons will appear in pastel colors, making them easier to see in dark mode.
Here’s a quick reminder of how to adjust page setup in Google Docs™, just in case:
Enjoy writing in Google Docs™ with this simple dark mode solution!
Accidentally deleted some text in Google Docs™? Fortunately, Google Docs™ offers an automatic versioning system, making it simple to recover lost content. Here’s a quick guide to restoring a previous version of your document.
Access Version History:
Navigate to File > Version history > See version history.
Enable Change Visibility:
Ensure “Show changes” at the bottom is checked.
Explore Versions:
Use the arrows next to the dates to expand and see detailed versions.
Locate Your Desired Version:
Click on the timestamp of a version to preview its content.
Restore the Version:
Once you find the correct version, click Restore this version at the top left.
Exit Version History:
Confirm that you want to revert to the selected version.
This process ensures you can recover your content efficiently, even after accidental deletions.
** When this recovery method will not work: You need to be able to open your document access the Version History. If opening the document fails this will not work. A solution can be to try different browsers (Chrome or Firefox) and devices. You might be able to select contents from the document and copy them to the clipboard even when the file opening process is crashing. You can then paste it to another document in another browser tab.
Even after restoring an earlier version, you can always revert to newer versions if needed. Google Docs™ retains the entire version history, ensuring that no edits are permanently lost.
Familiarize yourself with the version restoration process by practicing on a test document. Create a new document, make edits, and restore previous versions to build confidence before working on critical files.
The version history provides a reliable way to protect your documents. For additional safety, create backups by selecting File > Make a copy or download your document in .docx format to your computer.
Google Docs™ now includes a new organizational feature called document tabs, enabling users to create and manage multiple tabs within a single document. This functionality mirrors the familiar tabbed layout used in Google Sheets, offering a structured way to organize and navigate documents efficiently.
To create and manage tabs:
If the tabs are not visible:
Document tabs in Google Docs™ provide an effective method to organize and navigate content within a single document. By leveraging features such as subtabs and a three-level nesting structure, users can manage complex information more efficiently. Understanding these tools and troubleshooting common issues ensures a smooth workflow for both individual and collaborative document management.
Have you ever opened a document in Google Docs™ and noticed that the pages seem to have vanished? You can still see the content, but the familiar page structure or page breaks are nowhere to be found. Don’t worry—this is a common issue that often has a straightforward explanation and solution.
There are two formats in which documents can be displayed in Google Docs™:
If you cannot see individual pages, your document is likely in Pageless Format.
After these steps, your document should return to the standard page layout with visible page breaks.
Note: Each tab needs to be configured individually.
Google Docs™ offers two main layout options for documents:
If you’ve been puzzled by the disappearing pages, now you know how to resolve the issue and understand the differences between these two modes in Google Docs™.
Happy writing!
Google Docs™ implements an automatic saving system that continuously stores all changes made to documents. Unlike traditional word processors, there is no manual save function or save button required.
When creating a new document, the system automatically creates and saves it with the default file name “Untitled document”. The recommended first step is to change this default file name:
Google Docs™ maintains functionality during internet disruptions through local browser storage. Changes made offline are automatically synchronized when the connection is restored.
To access previous document versions:
For users transitioning from traditional word processors, note that Ctrl+S (Cmd+S on macOS) keyboard shortcuts are usually not required as all changes are saved automatically.