Skip to content

Know-How

5 posts with the tag “Know-How”

Enable Dark Mode in Google Docs™ (only Google Chrome)

Staring at a bright screen for extended periods can strain your eyes. Many users prefer dark mode when working with Google Docs™, but unfortunately, the software doesn’t have a built-in option to enable it. However, there’s an easy workaround for Google Chrome™ users that will turn all Google applications into dark mode.

How to Enable Dark Mode in Google Chrome™

Table in Google Docs™

Follow these steps to activate dark mode globally across Google applications using Chrome:

  1. Open Google Chrome™.
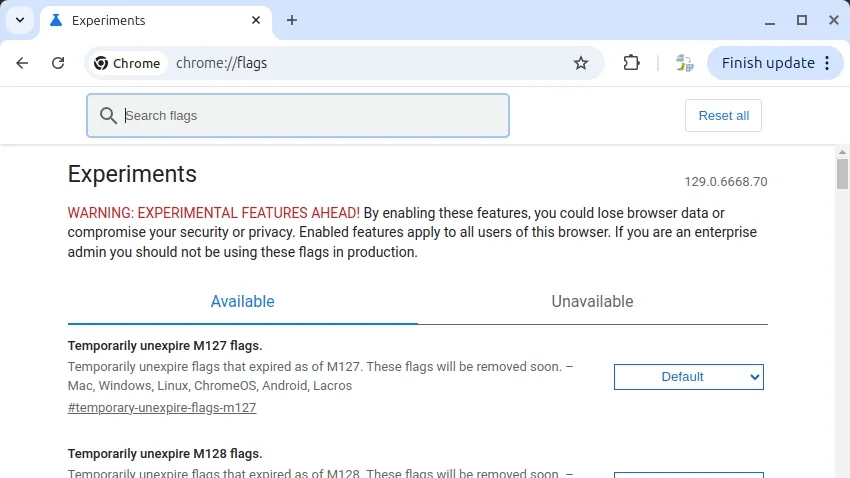
  2. Type chrome://flags/ into the address bar and press Enter.
  3. In the search bar at the top of the page, type dark mode.
  4. Locate the result titled Auto Dark Mode for Web Contents.
  5. Click on the dropdown menu next to it and select Enabled.
  6. A message will appear stating, “Your changes will take effect the next time you relaunch Chrome.” Click Relaunch.

Once enabled, this setting will turn on dark mode for all Google products, including Google Docs™, Google Slides™, Google Sheets™, and Google Forms™. Additionally, icons will appear in pastel colors, making them easier to see in dark mode.

Example: How to Adjust Page Setup in Google Docs™

Here’s a quick reminder of how to adjust page setup in Google Docs™, just in case:

  1. Open a Google Docs™ document.
  2. Go to File > Page setup.
  3. Choose Pages or Pageless at the top of the dialog box.
  4. Click OK to save your selection.

Enjoy writing in Google Docs™ with this simple dark mode solution!

Accidently deleted text in Google Docs™? Here is how to restore it

Accidentally deleted some text in Google Docs™? Fortunately, Google Docs™ offers an automatic versioning system, making it simple to recover lost content. Here’s a quick guide to restoring a previous version of your document.


Steps to Restore a Previous Version

  1. Access Version History:
    Navigate to File > Version history > See version history.

  2. Enable Change Visibility:
    Ensure “Show changes” at the bottom is checked.

  3. Explore Versions:
    Use the arrows next to the dates to expand and see detailed versions.

  4. Locate Your Desired Version:
    Click on the timestamp of a version to preview its content.

  5. Restore the Version:
    Once you find the correct version, click Restore this version at the top left.

  6. Exit Version History:
    Confirm that you want to revert to the selected version.

This process ensures you can recover your content efficiently, even after accidental deletions.

** When this recovery method will not work: You need to be able to open your document access the Version History. If opening the document fails this will not work. A solution can be to try different browsers (Chrome or Firefox) and devices. You might be able to select contents from the document and copy them to the clipboard even when the file opening process is crashing. You can then paste it to another document in another browser tab.

Pro Tip 1

Even after restoring an earlier version, you can always revert to newer versions if needed. Google Docs™ retains the entire version history, ensuring that no edits are permanently lost.

Pro Tip 2

Familiarize yourself with the version restoration process by practicing on a test document. Create a new document, make edits, and restore previous versions to build confidence before working on critical files.

Pro Tip 3

The version history provides a reliable way to protect your documents. For additional safety, create backups by selecting File > Make a copy or download your document in .docx format to your computer.

What are the new Google Docs™ document tabs

Google Docs™ now includes a new organizational feature called document tabs, enabling users to create and manage multiple tabs within a single document. This functionality mirrors the familiar tabbed layout used in Google Sheets, offering a structured way to organize and navigate documents efficiently.

Key Features of Document Tabs

Overview of Tabs

  • Visual Document Structure: The tabs provide a visual representation of the document’s organization in the left panel, making navigation straightforward.
  • Sections for Navigation: Each tab can function as a section of the document, helping users manage complex content.

Default Tab Behavior

  • New documents include a default tab labeled “Tab 1”
  • “Tab 1” cannot be deleted unless at least one other tab is present in the document

Adding and Managing Tabs

To create and manage tabs:

  1. Open a document in Google Docs™ on your computer
  2. Access the left panel by clicking Show tabs & outlines in the top-left corner
  3. Click Add tab (Plus icon) to create a new tab. This process is similar to adding multiple sheets in Google Sheets
  4. (Optional) To add a subtab, click Tab options, then select Add subtab (Plus icon)

Tips for Tab Management

  • Drag and drop one tab onto another to create a subtab. Tabs can be nested up to three levels deep
  • In Suggestion Mode, tabs are visible but cannot be added, moved, or deleted

Troubleshooting Common Tab Issues

Hidden Left Panel

If the tabs are not visible:

  1. Ensure the left panel is not hidden
  2. Open the panel by clicking Show tabs & outlines at the top left

Maximum Tab Limit

  • Google Docs™ supports up to 100 tabs per document
  • If additional tabs cannot be created, confirm that the tab limit has not been reached

Printing and Downloading Tabs

  • When downloading or printing a document, only the active tab will be included
  • To download or print all tabs at once, follow these steps:
    1. Open Google Drive on your computer
    2. Right-click the document
    3. Select Download
    4. Print the downloaded file as needed

Summary

Document tabs in Google Docs™ provide an effective method to organize and navigate content within a single document. By leveraging features such as subtabs and a three-level nesting structure, users can manage complex information more efficiently. Understanding these tools and troubleshooting common issues ensures a smooth workflow for both individual and collaborative document management.

Why Can’t I See the Pages on Google Docs™?

Why Can’t I See Pages in Google Docs™?

Have you ever opened a document in Google Docs™ and noticed that the pages seem to have vanished? You can still see the content, but the familiar page structure or page breaks are nowhere to be found. Don’t worry—this is a common issue that often has a straightforward explanation and solution.

Solution

There are two formats in which documents can be displayed in Google Docs™:

  • **Pages Format **
  • Pageless Format

If you cannot see individual pages, your document is likely in Pageless Format.

Quick Fix:

  1. Open your document in Google Docs™.
  2. Go to the Format tab and select Switch to Pages format.

Long-Term Fix:

  1. Open your document in Google Docs™.
  2. Go to File > Page setup.
  3. At the top of the dialog box, select Pages.
  4. Click the Set as default button to apply this setting to new documents.
  5. Press the blue OK button to save your changes.

After these steps, your document should return to the standard page layout with visible page breaks.

Note: Each tab needs to be configured individually.

What Are the Differences Between Pages and Pageless Modes?

Google Docs™ offers two main layout options for documents:

Pages

  • This is the traditional setup where your document is divided into pages with clear page breaks.
  • You can add headers, footers, page numbers, and other page-specific elements.
  • Margins, orientation, and page size can be adjusted to suit your needs.

Pageless

  • In this mode, the document scrolls continuously without page breaks.
  • Images and tables adjust dynamically to fit your screen.
  • Text wraps based on your zoom level.
  • You can create wider tables and view them by scrolling horizontally.

Key Limitations of Pageless Mode:

  • Elements like headers, footers, page numbers, and columns won’t be visible or editable.
  • Watermarks and other page-specific features won’t appear.

Advantages of Pages Mode:

  • You can use all features that require a defined page layout, such as columns, headers, and footers.

If you’ve been puzzled by the disappearing pages, now you know how to resolve the issue and understand the differences between these two modes in Google Docs™.

Happy writing!

How to save a Google Docs™ document

Google Docs™ implements an automatic saving system that continuously stores all changes made to documents. Unlike traditional word processors, there is no manual save function or save button required.

When creating a new document, the system automatically creates and saves it with the default file name “Untitled document”. The recommended first step is to change this default file name:

  1. Locate “Untitled document” in the top left corner
  2. Click on the text
  3. Enter your document file name
  4. Press Enter or click outside the text field

Offline Functionality

Google Docs™ maintains functionality during internet disruptions through local browser storage. Changes made offline are automatically synchronized when the connection is restored.

Version Management

To access previous document versions:

  1. Navigate to File > Version history
  2. Select “See version history”
  3. Review or restore previous versions as needed

Technical Notes

  • Saving occurs automatically every few seconds
  • Documents are stored in Google Drive with the specified file name
  • Document changes are tracked and merged automatically when multiple users edit simultaneously

For users transitioning from traditional word processors, note that Ctrl+S (Cmd+S on macOS) keyboard shortcuts are usually not required as all changes are saved automatically.