Skip to content

Tips & Tricks

How to Change Google Docs Pageless Width

Struggling to adjust the width in Google Docs’ pageless format? It’s not in Page Setup where you’d expect!

The Fix:

  1. Enable Pageless: File > Page setup > Pageless.
  2. View > Text Width: Choose Narrow, Medium, or Wide.

That’s it! Not intuitive, but now you know.

Share Google Docs Anonymously

Want to share a Google Doc anonymously? Google Docs lacks a direct “anonymous share,” but here’s how to do it:

Options:

  1. Publish to Web: File > Share > Publish to Web. Creates a public, read-only link. Fully anonymous, but no comments/edits allowed.
  2. Separate Account: Create a new Google account with a generic name. Share the doc from that account, allowing comments/suggestions while hiding your primary identity.

Choose based on whether you need collaboration or complete anonymity.

Google Docs Tabs Downloading the Whole Document as One File

Are you using tabs in Google Docs to organize your document, but finding that you can only download one tab at a time? You’re not alone! Many users have been confused about how to download the entire document, including all tabs, as a single file.

The Problem:

When you have a Google Docs document organized with tabs, the default “Download” option within the open document (File > Download) only downloads the currently active tab. This can be frustrating if you’ve meticulously organized your work and want to export it all at once.

The Solution (and the Catch):

There are two ways to download in Google Docs:

  • Incorrect Method (Downloads Current Tab Only): File > Download (while the document is open). This only downloads the currently selected tab.
  • Correct Method (Downloads Entire Document): Download from the Google Drive context menu.

Here’s how to download the entire Google Docs document (including all tabs) as one file:

  1. Go to your Google Drive.
  2. Locate the Google Docs file you want to download.
  3. Right-click on the file.
  4. Select Download.

Enable Dark Mode in Google Docs™ (only Google Chrome)

Staring at a bright screen for extended periods can strain your eyes. Many users prefer dark mode when working with Google Docs™, but unfortunately, the software doesn’t have a built-in option to enable it. However, there’s an easy workaround for Google Chrome™ users that will turn all Google applications into dark mode.

How to Enable Dark Mode in Google Chrome™

Table in Google Docs™

Follow these steps to activate dark mode globally across Google applications using Chrome:

  1. Open Google Chrome™.
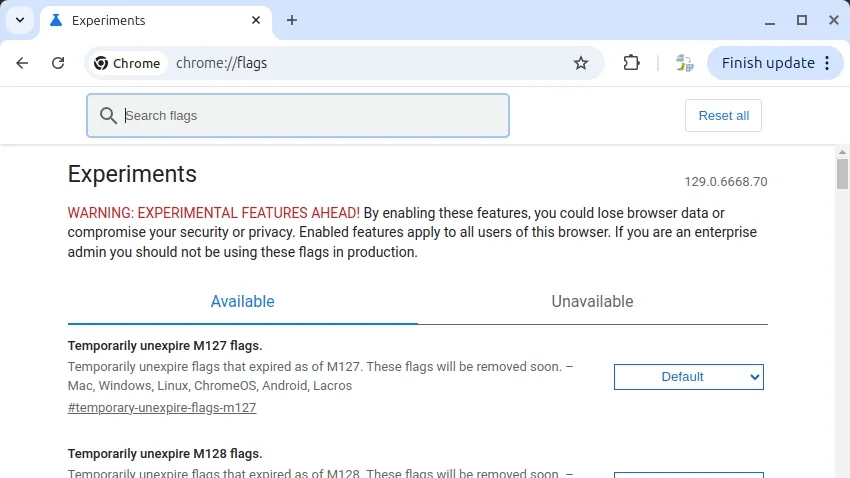
  2. Type chrome://flags/ into the address bar and press Enter.
  3. In the search bar at the top of the page, type dark mode.
  4. Locate the result titled Auto Dark Mode for Web Contents.
  5. Click on the dropdown menu next to it and select Enabled.
  6. A message will appear stating, “Your changes will take effect the next time you relaunch Chrome.” Click Relaunch.

Once enabled, this setting will turn on dark mode for all Google products, including Google Docs™, Google Slides™, Google Sheets™, and Google Forms™. Additionally, icons will appear in pastel colors, making them easier to see in dark mode.

Example: How to Adjust Page Setup in Google Docs™

Here’s a quick reminder of how to adjust page setup in Google Docs™, just in case:

  1. Open a Google Docs™ document.
  2. Go to File > Page setup.
  3. Choose Pages or Pageless at the top of the dialog box.
  4. Click OK to save your selection.

Enjoy writing in Google Docs™ with this simple dark mode solution!

Accidently deleted text in Google Docs™? Here is how to restore it

Accidentally deleted some text in Google Docs™? Fortunately, Google Docs™ offers an automatic versioning system, making it simple to recover lost content. Here’s a quick guide to restoring a previous version of your document.


Steps to Restore a Previous Version

  1. Access Version History:
    Navigate to File > Version history > See version history.

  2. Enable Change Visibility:
    Ensure “Show changes” at the bottom is checked.

  3. Explore Versions:
    Use the arrows next to the dates to expand and see detailed versions.

  4. Locate Your Desired Version:
    Click on the timestamp of a version to preview its content.

  5. Restore the Version:
    Once you find the correct version, click Restore this version at the top left.

  6. Exit Version History:
    Confirm that you want to revert to the selected version.

This process ensures you can recover your content efficiently, even after accidental deletions.

** When this recovery method will not work: You need to be able to open your document access the Version History. If opening the document fails this will not work. A solution can be to try different browsers (Chrome or Firefox) and devices. You might be able to select contents from the document and copy them to the clipboard even when the file opening process is crashing. You can then paste it to another document in another browser tab.

Pro Tip 1

Even after restoring an earlier version, you can always revert to newer versions if needed. Google Docs™ retains the entire version history, ensuring that no edits are permanently lost.

Pro Tip 2

Familiarize yourself with the version restoration process by practicing on a test document. Create a new document, make edits, and restore previous versions to build confidence before working on critical files.

Pro Tip 3

The version history provides a reliable way to protect your documents. For additional safety, create backups by selecting File > Make a copy or download your document in .docx format to your computer.